Time vault is a GUI application that can assist users in taking incremental back up. Its functionality is similar to Time/Machine available on Apple MACs
TimeVault makes automated snapshots of (selected parts of) the file system. You can roll back to a previous version of a file or directory, or just view it the way it was when the snapshot was taken. Snapshots are protected from accidental deletion or modification since they are read-only by default. The super-user can delete intermediate snapshots to save space, but files and directories that existed before or after the deletion will still be accessible
It's also integrates into Nautilus, so you can go the properties page for a snapshot'ed file (right-click in Nautilus and choose properties), and see a 'Previous Versions' tab with a calendar on it.
TimeVault Features include:
* Automatically saves and recovers data
* Actively monitors selected folders
* Automated snapshots
* Tight integration with Nautilus, the GNOME file manager
* File-system agnostic
* Highly configurable
* Intuitive interface
* Archive browser
TimeVault Installation and Configuration:
Download the .deb file from here, doubleclick on this file to install TimeVault.
After installing the .deb file, there are two steps required to complete installation:
You must configure TimeVault, the backend will start automatically but the notifier needs to be started: To get the notifier app to start in your systray whenever you log in you can add it to your startup programs in System > Preferences > Startup Applications, you should have an option to add a program click that, name it TimeVault and put:
Using TimeVault:
There are three tabs: General, Include and Exclude.
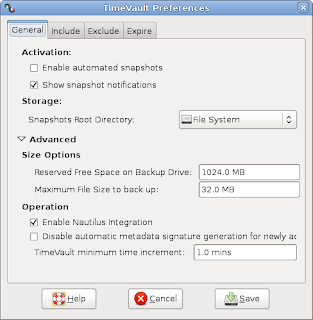
General:
Enable Automated Snapshots: By default, TimeVault will not automatically take snapshots of your system. Checking this box will tell it to automatically take daily snapshots.
Show snapshot notifications: This switch toggles on and off whether snapshot notifications are to be shown or not.
Snapshot Root Directory: Where to store the snapshots. Ideally, you should pick a directory that is mounted onto another physical drive from the data you are backing up. This is so that, in the case of a hard-disk failure, the backups will remain intact (unless the drive containing the backups fails, in which case the current version of the data remains).
Make sure you change the settings under Advance to include your largest file, currently it is only set for 32mb. This is not large enough if you have videos as part of a back up. You may consider to back up to a network drive, in the case of total hard drive failure your data will be safe.
Include:
Backup paths are listed here. Every directory that you want snapshot should be added to this list.
Exclude:
Paths or patterns to exclude from the snapshots should be listed here.
When you have finished making the necessary changes click the save button and TimeVault should pop up a message saying. You have included new directories in the TimeVault. File signatures will now be computed. Click ok in this box and TimeVault should be active and will start watching your files.
TimeVault makes automated snapshots of (selected parts of) the file system. You can roll back to a previous version of a file or directory, or just view it the way it was when the snapshot was taken. Snapshots are protected from accidental deletion or modification since they are read-only by default. The super-user can delete intermediate snapshots to save space, but files and directories that existed before or after the deletion will still be accessible
It's also integrates into Nautilus, so you can go the properties page for a snapshot'ed file (right-click in Nautilus and choose properties), and see a 'Previous Versions' tab with a calendar on it.
TimeVault Features include:
* Automatically saves and recovers data
* Actively monitors selected folders
* Automated snapshots
* Tight integration with Nautilus, the GNOME file manager
* File-system agnostic
* Highly configurable
* Intuitive interface
* Archive browser
TimeVault Installation and Configuration:
Download the .deb file from here, doubleclick on this file to install TimeVault.
After installing the .deb file, there are two steps required to complete installation:
You must configure TimeVault, the backend will start automatically but the notifier needs to be started: To get the notifier app to start in your systray whenever you log in you can add it to your startup programs in System > Preferences > Startup Applications, you should have an option to add a program click that, name it TimeVault and put:
/usr/bin/timevault-notifierin the a terminal , you can put whatever you like in the comments box. After you have done this if you log out and back in again you should magically have the TimeVault notifier app sitting in your systray. Right click on it and go to preferences to configure TimeVault as you wish.
Using TimeVault:
There are three tabs: General, Include and Exclude.

General:
Enable Automated Snapshots: By default, TimeVault will not automatically take snapshots of your system. Checking this box will tell it to automatically take daily snapshots.
Show snapshot notifications: This switch toggles on and off whether snapshot notifications are to be shown or not.
Snapshot Root Directory: Where to store the snapshots. Ideally, you should pick a directory that is mounted onto another physical drive from the data you are backing up. This is so that, in the case of a hard-disk failure, the backups will remain intact (unless the drive containing the backups fails, in which case the current version of the data remains).
Make sure you change the settings under Advance to include your largest file, currently it is only set for 32mb. This is not large enough if you have videos as part of a back up. You may consider to back up to a network drive, in the case of total hard drive failure your data will be safe.
Include:
Backup paths are listed here. Every directory that you want snapshot should be added to this list.
Exclude:
Paths or patterns to exclude from the snapshots should be listed here.
When you have finished making the necessary changes click the save button and TimeVault should pop up a message saying. You have included new directories in the TimeVault. File signatures will now be computed. Click ok in this box and TimeVault should be active and will start watching your files.
No comments:
Post a Comment